

When I think about the holiday season, the first thing that comes to mind is the warm glow of lights, the scent of pine and cinnamon, and the joy of creating something meaningful with my own hands. One of my favorite ways to capture that festive magic is through Christmas shadow boxes. These little 3D frames feel like tiny windows into a holiday wonderland, where I can layer textures, colors, and memories into a single display. I remember the first time I made one—it was a small 6×6 frame with faux snow, a miniature bottlebrush tree, and a “Believe” sign. The satisfaction of seeing it come together, knowing it would light up my mantel, was unforgettable. Shadow boxes are not just décor; they’re a blend of nostalgia, creativity, and personal expression. You can make them as simple or as intricate as you like, and they make such heartfelt gifts that everyone seems to cherish.
Key Points:
- Easy DIY for personalized holiday decor
- Combines creativity, memories, and festive spirit
- Great for gifting or home display

What is a Christmas Shadow Box?
A Christmas shadow box is essentially a deep picture frame that allows you to create three-dimensional scenes inside. Unlike a regular frame that holds a flat photo or artwork, a shadow box gives space to layer elements like miniature trees, ornaments, or tiny figurines. Think of it as creating a tiny world inside a frame, a miniature story frozen in time.

I often like to include small mementos, like ornaments from childhood or tiny snowflakes, so every box tells a personal story. The beauty of these shadow boxes is that they can be as abstract or as realistic as you want, letting you channel your holiday memories into a tangible piece of décor.

Why Make Your Own Christmas Shadow Box?
There’s something uniquely satisfying about making your own Christmas shadow box ideas. It’s more than just decoration; it’s an experience. I love that I can customize every detail—the background paper, the placement of tiny trees, or the glitter on a snowy scene.

Not only does it save money compared to buying pre-made options, but it also adds a personal touch that store-bought items just can’t replicate. I’ve gifted shadow boxes to friends and family, and the joy on their faces when they realize it’s handmade is priceless. DIY shadow boxes allow you to infuse creativity and love into your holiday traditions in a way that resonates far beyond the season.
Essential Materials for Christmas Shadow Boxes
Before diving into a project, having the right materials makes a world of difference. My go-to items include shadow boxes in sizes like 6×6, 8×10, and 12×12 inches, which provide flexibility for different designs. Scrapbook paper or cardstock in holiday colors sets the foundation for your scene, and I often mix patterns like plaid, gold foil, and winter motifs.
Miniature bottlebrush trees, faux snow, glitter, and tiny wooden cutouts—like “Believe” or “Joy”—bring life to the box. For those using a cutting machine like a Cricut, vinyl decals can add a polished, professional touch. I always recommend double-sided tape for easy placement, though hot glue is great for heavier elements. Having these materials on hand makes the crafting process smoother and more enjoyable.
Easy Christmas Shadow Box Ideas for Beginners

If you’re just starting out, I’d recommend beginning with a simple Christmas shadow box. One time, I grabbed a 12×12 scrapbook paper pad and found a sheet divided into four designs. I cut one square out, popped it into a 6×6 frame, and it looked instantly festive. You don’t need 3D elements to make it charming—sometimes, simplicity is the most powerful.
Adding small touches like a faux berry or a tiny sprig of greenery can elevate the design without overwhelming it. This kind of project can be done in under five minutes, making it perfect for last-minute gifts or quick seasonal décor. I often have one or two of these simple designs scattered around my home alongside more elaborate displays.
3D Christmas Shadow Box Ideas

For a bit more depth, 3D shadow boxes are where the magic happens. Layering paper cutouts, mini trees, and wooden words can create a festive scene that feels alive. I once made a box using plaid scrapbook paper, a wooden “Believe” cutout, and two tiny bottlebrush trees nestled in faux snow. The layering not only added dimension but also gave a tactile element that makes the scene feel immersive.

Painting the wood with gold metallic paint added a shimmer that caught the light beautifully. The key is balance—too many elements can clutter the scene, while too few may feel empty. Over the years, I’ve found that one wooden cutout, two trees, and a sprinkling of snow often hits the sweet spot.
Light-Up Christmas Shadow Boxes

Adding lights to your Christmas shadow box ideas transforms them into a cozy, glowing focal point. I love using battery-operated LEDs or fairy lights because they’re safe and flexible. A small nativity scene or snowy cabin can really come to life with subtle illumination. When arranging the lights, I weave them behind layers so the glow peeks through without overpowering the details.

Once, I experimented with colored LED lights inside a winter scene box, and the effect was mesmerizing—it looked like a tiny holiday village twinkling on my mantel. Lighting adds drama and warmth, giving your shadow box an almost magical quality.
Cricut and Vinyl Shadow Box Ideas
For those who enjoy a modern twist, Cricut or Silhouette machines are game-changers. You can create custom vinyl decals like “Let it Snow” or personalized names to adhere to the glass.
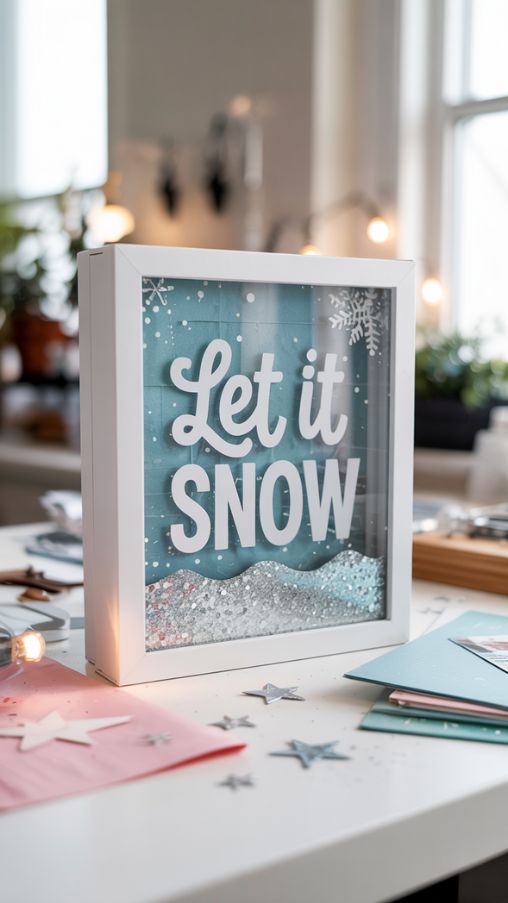
I’ve made boxes where the background was soft blue scrapbook paper, then added glittery faux snow at the bottom and applied a white vinyl decal on the front. The precision of the Cricut makes the design look professional without needing advanced skills. My only advice is to carefully measure the glass portion, not the frame, to avoid oversized decals. This technique combines DIY charm with a polished finish.
Christmas Village and Nativity Scene Shadow Boxes

Miniature villages and nativity scenes are classic motifs for shadow boxes. I enjoy using tiny houses and figurines to build a scene, layering them with snow, trees, and soft lights. One year, I created a nativity-themed box using small wooden figures and a star-lit backdrop. Every time I pass by, I feel a sense of calm and nostalgia.

This type of shadow box is perfect for storytelling, blending holiday tradition with personal creativity. I recommend experimenting with shapes—house-shaped boxes add charm and a narrative element that a square frame may not convey.
Themed Shadow Box Ideas

There’s no shortage of ways to theme your shadow boxes. Some of my favorites include:
| Theme | Description | Time to Create |
| Jingle Bells | A playful box with real jingle bells layered over a festive background | 10 minutes |
| Snowy Panorama | Miniature cabin, snowflakes, and soft lighting for a winter wonderland effect | 20 minutes |
| Red & Gold Ornament | Elegant ornaments and glitter on a dark background | 15 minutes |

I personally love mixing playful and elegant themes. A Jingle Bells box can sit next to a more sophisticated Red & Gold display, creating contrast and charm in my holiday décor.
Creative DIY Techniques for Shadow Boxes
Layering paper, incorporating small 3D elements, and adding sparkly touches can transform a simple shadow box into a showpiece. I often use faux snow, glitter, and metallic paints to bring depth and shine. Small wooden cutouts can be painted and positioned to add dimension, while mini bottlebrush trees or snow-dusted figurines introduce tactile elements. Sometimes, I even mix textures—glossy paper with matte elements—to make the display visually interesting. These techniques allow your creativity to shine and can be adapted to any skill level.

| Technique | Effect | Recommended Materials |
| Layered Paper | Adds depth and texture | Scrapbook paper, cardstock |
| 3D Elements | Creates immersive scenes | Bottlebrush trees, mini figurines, wooden cutouts |
| Glitter & Snow | Enhances festive sparkle | Faux snow, diamond dust, glitter |
Tips for Personalizing Your Christmas Shadow Box
I love adding personal touches that reflect my family’s memories. Names, dates, and small ornaments from past holidays can make each box unique. I’ve even included a tiny photo of a family pet in one of my boxes—it became a conversation starter and a keepsake. You can also customize colors to match your home décor or coordinate with the rest of your holiday decorations. Personalization makes your Christmas shadow box ideas feel special, transforming them from generic décor to treasured mementos.
Budget-Friendly Christmas Shadow Box Ideas
Not every festive project needs to break the bank. Dollar stores, craft stores, and repurposed materials can make beautiful shadow boxes. I’ve crafted boxes using simple 6×6 frames, leftover scrapbook paper, and inexpensive bottlebrush trees. Even faux snow and glitter from discount stores create a professional-looking effect. Quick hacks like using mini gift boxes or recycled packaging for layered elements can save both money and time. With a little creativity, you can make shadow boxes that feel luxe without spending a fortune.
Displaying and Gifting Your Shadow Boxes
Placement can elevate your shadow box from cute to captivating. Mantels, side tables, or shelves are ideal spots. I often group boxes of different sizes and themes together—it creates a miniature holiday gallery. For gifts, wrapping the shadow box in clear cellophane with a ribbon allows the recipient to see the scene while keeping it protected. Light-up boxes require extra care during transport, so I always pack them with soft padding. Nothing makes me happier than seeing someone’s eyes light up when receiving a handmade shadow box.
Inspiration and Resources for Christmas Shadow Box Ideas
Pinterest and YouTube are treasure troves for inspiration. Boards curated by crafters like Valerie Smith or tutorials from channels like Jennifer Maker provide endless ideas. Blogs such as First Day of Home and Crafts by Amanda also offer step-by-step instructions and material lists. For those who enjoy digital design, SVG templates can make precise cutouts easy. Personally, I like mixing inspiration from multiple sources—sometimes a tutorial sparks an idea, and then I tweak it to make it uniquely mine.
Final Thoughts on Christmas Shadow Box Ideas
Christmas shadow boxes are more than décor—they’re tiny stories, layered with memories, light, and love. I’ve found joy not only in crafting them but also in sharing them with friends and family. Each box is a reflection of creativity and sentiment, a tangible piece of the season to cherish year after year. Whether you’re starting with a simple design or exploring 3D lighted boxes, there’s no wrong way to create. The process itself is a celebration of holiday spirit.
FAQ Section
What is a Christmas shadow box?
A Christmas shadow box is a deep frame that allows you to create 3D holiday scenes with decorations, paper, and miniatures.
How do I make a shadow box look 3D?
Use layers of paper, mini trees, wooden cutouts, and faux snow to add depth and dimension.
Can I use LED lights in a shadow box?
Yes, battery-operated LED or fairy lights are perfect for illuminating scenes safely.
What size shadow box is best?
Common sizes are 6×6, 8×10, or 12×12 inches, depending on your design and space.
Are Cricut decals necessary for a festive look?
Not at all—vinyl decals add polish, but simple paper designs can be just as beautiful.
Where can I find materials for shadow boxes?
Craft stores, Dollar Tree, online retailers, and leftover holiday decorations work well.
Can I personalize a Christmas shadow box?
Absolutely—add names, dates, small photos, or ornaments for a unique, meaningful touch.