Ribbon is the cheapest thing you can add to a Christmas tree, and it is also the one thing that can make a tree look expensive. A single strand of velvet weaving through the branches does more than fifty extra ornaments ever could.

Easy ways to add velvet ribbon to a Christmas tree for an elegant and luxurious holiday look
  • Save

The trouble is knowing where to start. These 13 ideas walk you through how to add ribbon to your Christmas tree, from simple bows and loops to mesh and wide ribbon, with clear steps for each one. Every idea says what it looks like, how hard it is, and what to buy, so you can finish in an evening and still like it in January. Most can be done after the ornaments are up, so you won’t need to start over.

1. How to Add Ribbon Bows to Your Christmas Tree
Easy tuck-in ribbon Christmas tree decorating idea for beginners with simple grosgrain ribbon
  • Save

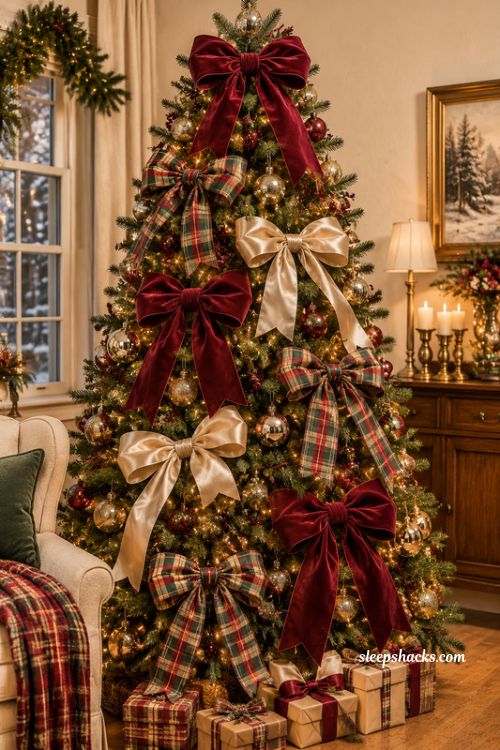
Make a full bow with long tails, then clip or wire it onto a branch so it sits flat against the tree like a gift tied to the needles. Space the bows in a loose zigzag from top to bottom, and let the tails drape over the branches below. Velvet, plaid, and satin all hold a bow well.

Wired ribbon makes the job easy, since you can reshape the loops after tying. Fasten each bow with a green pipe cleaner or floral wire, twisted around a sturdy branch. Roughly one bow per foot of tree height works well, at six to eight inches across. Thin ribbon bows can look lost on a full tree, so choose a wider width.

2. Easy Tuck-In Ribbon for Beginners
Easy tuck-in ribbon Christmas tree decorating idea for beginners with simple grosgrain ribbon
  • Save

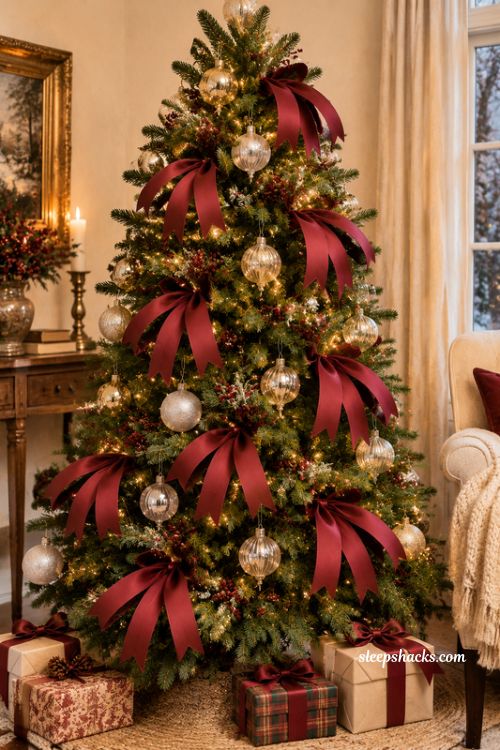
Cut ribbon into lengths about as long as your forearm, fold each in half, then push the folded middle deep into the branches so only two soft ends show. The ribbon seems to grow out of the tree itself. Place the pieces between ornaments in clusters of three, all in one color.

There is no tying, no wire, and no measuring. It takes about fifteen minutes on a medium tree, so it suits first-timers and anyone short on time. Choose a stiffer ribbon like grosgrain so the ends hold their shape. If your branches are very sparse, drape the ribbon instead, because a bare spot has nothing to grip.

3. How to Add Ribbon After Ornaments Are Up


If the ornaments are already hung, add ribbon last, so you can see exactly where the gaps are. Thread the ribbon behind ornaments, over branch tips, and through any spot where the tree looks thin. Pick a color that already appears in your ornaments so the ribbon ties everything together.

Go slowly and keep glass ornaments from knocking together. A second person to hold the spool saves a lot of tugging. This method is perfect if you decide on ribbon halfway through, since nothing has to come down. It takes about thirty minutes, and the ribbon should stay loose, never pulled tight across the branches.

4. How to Add Mesh Ribbon to Your Christmas Tree
A medium-wide, eye-level professional Christmas interior photograph captured with a high-end full-frame camera and a 35mm lens, featuring a magnificent, full evergreen Christmas tree decorated with elegant ribbon loops as the central visual attraction. The tree showcases dozens of beautifully shaped, identical ribbon loops arranged in graceful horizontal rows along the tips of the evergreen branches. Each loop resembles a delicate fabric petal, creating a sophisticated layered effect that gives the entire tree a polished, tailored and luxurious appearance. The ribbon loops are created from individual lengths of approximately twelve to fifteen inches of wide wired ribbon, folded into smooth oval shapes with both ends discreetly joined and secured to sturdy branches using concealed floral wire. Each loop stands slightly outward from the branch tips, maintaining a consistent curved silhouette. The loops are arranged in organized rows using a single coordinated ribbon colour, with carefully balanced spacing between each decorative element. Their repeated petal-like shapes create beautiful rhythm, depth and visual continuity throughout the tree. The interior features an elegant European farmhouse living room blended with traditional Christmas styling and understated luxury. The tree stands against a warm ivory wall, accompanied by a vintage natural-oak console, a softly upholstered cream armchair and a few beautifully wrapped Christmas gifts beneath the branches. Subtle glass ornaments, understated champagne-gold decorations and natural evergreen details complement the ribbon loops without distracting from their distinctive shape. A sophisticated colour palette of deep burgundy, warm champagne gold, soft ivory and rich forest green. The primary ribbon is a luxurious deep burgundy wired velvet with a subtle woven texture, softly reflective edges and enough internal structure to hold perfectly rounded loops. Every loop has consistent dimensions, smooth curves and realistic fabric folds. The wired edges remain naturally shaped without appearing rigid or artificial. Warm golden Christmas fairy lights are distributed throughout the tree, creating delicate highlights along the ribbon loops and illuminating the evergreen needles. Soft evening ambient lighting fills the surrounding living room, revealing the individual petal-like shapes and the rich fabric texture. Realistic shadows form between the layered branches and ribbon loops, while delicate reflections appear on the glass ornaments. The atmosphere is elegant, peaceful, nostalgic and beautifully festive, capturing the charm of a carefully decorated Christmas tree where simple repeated ribbon loops create a luxurious designer appearance. The visual story should communicate that ribbon loops are an easy alternative to traditional bows, offering a neat, consistent and sophisticated finish without complicated decorating skills. Compose the photograph vertically, showing the entire Christmas tree from its uppermost tip to its base. Make the rows of individual ribbon loops immediately recognizable, with their petal-like silhouettes clearly visible along the branch tips. Ensure the loops are evenly distributed, consistently shaped and sufficiently separated to preserve their individual appearance. Use a natural eye-level camera perspective with balanced interior styling and a strong visual hierarchy that makes the ribbon loops the unmistakable focal point. Professional luxury home decor magazine photography, authentic European Christmas interior styling, realistic wired velvet fabric construction, accurately shaped ribbon loops, consistent decorative proportions, visible textile fibres, detailed evergreen needles, believable branch attachment, physically accurate lighting, natural shadows, realistic reflections, balanced exposure, refined editorial colour grading, crisp fine details, premium Pinterest Christmas decorating photography, vertical 2:3 portrait aspect ratio, photorealistic, ultra-realistic, high-resolution 4K visual quality. No people, no human figures, no text overlays, no typography, no logos, no watermarks, no borders, no cartoon styling, no illustration, no CGI appearance, no plastic-looking fabric, no traditional knotted bows, no malformed loops, no uneven ribbon shapes, no tangled ribbon, no floating decorations, no duplicated ornaments, no distorted branches, no overcrowded styling, no motion blur, no bokeh, no artificial depth-of-field blur, no excessive glow, no overexposed fairy lights. Keep the entire Christmas tree, every ribbon loop, fabric texture and visible interior detail naturally sharp, clear and realistically detailed.
  • Save

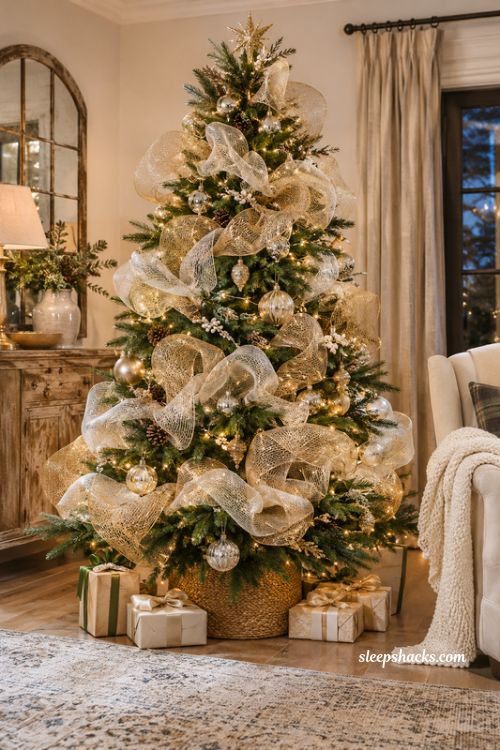
Mesh ribbon comes in wide rolls with a wired edge, and it puffs into airy clouds when you gather it. Fluff it along a branch, scrunch it every few inches, and secure each pouf with wire so it floats like a cloud. Gold or silver mesh glitters in the lights, while white or cream looks like drifting snow.

Mesh gives a lot of volume for a modest price, and one roll goes a long way on a tall tree. It suits full trees, where the fluffy shapes can fill gaps. It tangles easily, so cut it into sections before you start and keep the spool away from pets. On slim trees, use less so it doesn’t look busy.

5. How to Add Ribbon Loops to Your Christmas Tree

A medium-wide, eye-level professional Christmas interior photograph captured with a high-end full-frame camera and a 35mm lens, featuring a magnificent, tall, full evergreen Christmas tree decorated with luxurious wide ribbon cascades as the central visual attraction. Generous lengths of wide, approximately three-inch wired-edge ribbon flow from the top of the tree towards the lower branches in graceful, undulating waves, creating the appearance of a beautiful river of fabric flowing through the evergreen foliage. The ribbon follows a natural vertical cascading arrangement, with each section gently tucked behind sturdy branches at regular intervals to hold its flowing shape while allowing the fabric to drape freely over the branch tips. The wide ribbon creates generous curves and soft S-shaped movements, with alternating sections that fall forward over the branches and disappear naturally behind the foliage before emerging again. Its wired edges maintain beautifully sculpted waves without making the fabric appear rigid. The ribbon is distributed thoughtfully across the front and visible sides of the tree, creating an elegant sense of movement, volume and continuity. The decorative lights are installed first and remain clearly visible between the ribbon cascades, ensuring that the fabric complements rather than hides the illumination. The interior features a sophisticated European farmhouse living room with traditional Christmas elegance and understated luxury. The tall Christmas tree stands against a beautifully textured warm ivory wall, accompanied by a vintage natural-oak console, an elegant cream upholstered armchair and a few carefully wrapped Christmas gifts beneath its branches. Delicate glass ornaments, subtle antique-gold decorations and natural evergreen accents complement the flowing ribbon without competing with its visual importance. A refined colour palette of deep burgundy, champagne gold, warm ivory and rich forest green. The primary ribbon is luxurious, wide burgundy velvet with a discreet wired edge, a rich tactile surface and subtle natural highlights. Its substantial width creates a bold contrast against the detailed evergreen needles, while the soft fabric folds reveal authentic textile construction and realistic weight. Small champagne-gold ornaments and understated glass baubles provide delicate reflective accents. Warm golden Christmas fairy lights are installed throughout the branches before the ribbon decoration, creating small points of illumination that remain visible through the open spaces between the fabric cascades. Gentle evening ambient lighting illuminates the room, revealing the velvet texture, natural ribbon folds and realistic shadows beneath the branches. Subtle reflections appear on the glass ornaments, while the metallic details catch the light without excessive sparkle or artificial glow. The atmosphere is luxurious, welcoming, nostalgic and wonderfully festive, capturing the beauty of a grand Christmas tree transformed by flowing wide ribbon. The visual storytelling should communicate how a single generous ribbon can create a dramatic designer appearance, making the tree feel beautifully styled without excessive decorative accessories. Compose the photograph vertically, showing the entire tall Christmas tree from its topmost tip to its base. The wide ribbon cascades must be immediately recognizable, with several distinct flowing waves visible across the front of the tree. Clearly show how the ribbon disappears behind selected branches and re-emerges in elegant flowing sections. Preserve enough evergreen foliage between the ribbon sections so the tree remains naturally visible. Use a balanced eye-level camera perspective, realistic room proportions and carefully controlled visual hierarchy, keeping the ribbon decoration as the unmistakable focal point. Professional luxury home decor magazine photography, authentic European Christmas interior styling, realistic wide wired-edge velvet ribbon construction, natural fabric weight and folds, beautifully sculpted flowing cascades, detailed evergreen needles, physically accurate lighting, realistic shadows and reflections, accurate material proportions, refined editorial colour grading, crisp fine details, premium Pinterest Christmas decorating photography, vertical 2:3 portrait aspect ratio, photorealistic, ultra-realistic, high-resolution 4K visual quality. No people, no human figures, no text overlays, no typography, no logos, no watermarks, no borders, no cartoon styling, no illustration, no CGI appearance, no plastic-looking fabric, no narrow ribbon, no tiny bows, no stiff straight ribbon strips, no floating fabric, no tangled ribbon, no excessively tight ribbon placement, no ribbon covering all the branches, no hidden Christmas lights, no duplicated ornaments, no distorted tree branches, no overcrowded decorations, no motion blur, no bokeh, no artificial depth-of-field blur, no excessive glow, no overexposed fairy lights. Keep the entire Christmas tree, every flowing ribbon cascade, fabric texture and visible interior detail naturally sharp, clear and realistically detailed.
  • Save

Loops are bows without the knot. Cut ribbon twelve to fifteen inches long, fold it into a loop, then wire the ends together and attach it to a branch so the loop stands out. Build rows of loops in one color along the branch tips, and they look like petals.

Loops are faster than bows, and each one comes out identical, which gives a neat, tailored finish. Stiff, wired ribbon keeps the shape best. A dozen loops can cover a small tree in about fifteen minutes. They suit people who want polish without practice, though a large tree needs more loops than you might expect, so buy extra ribbon.

6. How to Add Wide Ribbon to Your Christmas Tree
A medium-wide, eye-level professional Christmas interior photograph captured with a high-end full-frame camera and a 35mm lens, featuring a magnificent, tall, full evergreen Christmas tree decorated with elegant horizontal ribbon swags as the central visual attraction. Luxurious lengths of satin ribbon are arranged in graceful horizontal curves, wrapping around the tree from branch to branch rather than falling vertically. Each ribbon swag creates a beautifully controlled downward curve approximately four to six inches deep, resembling sophisticated festive bunting draped naturally around the evergreen branches. The ribbon is arranged in multiple continuous-looking horizontal rows, starting near the top of the tree and progressing carefully downwards. Each swag is gently anchored at both ends to sturdy branches using discreet concealed floral wire, while the middle section hangs freely in a soft, symmetrical curve. The rows follow the natural circular shape of the tree, creating an elegant tiered arrangement with consistent spacing. Every horizontal section sits neatly beneath the row above, producing a refined, orderly and professionally styled appearance reminiscent of a luxurious department store Christmas window display. The interior features a sophisticated European traditional living room with refined Christmas styling, combining classic elegance with warm farmhouse details. The tree stands against a beautifully textured warm ivory wall, accompanied by a vintage dark-oak console, a gracefully upholstered cream armchair and carefully wrapped Christmas presents beneath its branches. Subtle glass baubles, delicate champagne-gold ornaments and understated evergreen decorations complement the horizontal ribbon arrangement without distracting from its distinctive design. A luxurious colour palette of deep burgundy, champagne gold, warm ivory and rich forest green. The primary ribbon is wide, flowing champagne-gold satin with a subtle luminous surface and beautifully draping fabric characteristics. Its edges follow smooth natural curves, with realistic folds and gentle highlights. The satin ribbon should appear soft and fluid rather than stiff, allowing every swag to maintain a graceful hanging shape. Small burgundy and antique-gold ornaments add sophisticated contrast between the horizontal rows. Warm golden Christmas fairy lights are distributed throughout the tree before the ribbon is installed, ensuring that individual lights remain visible between the horizontal swags. Soft evening ambient illumination gently highlights the satin fabric, revealing its natural sheen and delicate folds. Realistic shadows form beneath each curved ribbon section, while glass ornaments reflect small points of golden light. Maintain natural exposure without artificial glowing halos or excessive brightness. The atmosphere is elegant, nostalgic, welcoming and beautifully festive, capturing the feeling of a luxurious traditional Christmas display in a beautifully decorated home. The visual story should communicate the beauty of orderly horizontal ribbon swags, showing how carefully arranged fabric can transform a Christmas tree into a polished, sophisticated holiday centerpiece. Compose the photograph vertically, showing the entire Christmas tree from its topmost tip to its base. Clearly display multiple horizontal ribbon swags wrapping around the visible front of the tree, with each row forming an elegant four-to-six-inch-deep curve. Make the layered arrangement immediately recognizable and ensure that the ribbon follows the natural shape of the tree rather than appearing as disconnected straight strips. Maintain consistent spacing, balanced proportions and enough visible evergreen foliage between the ribbon rows. Use a natural eye-level camera perspective, balanced interior styling and a strong visual hierarchy that makes the horizontal ribbon arrangement the unmistakable focal point. Professional luxury home decor magazine photography, authentic European Christmas interior styling, realistic satin fabric construction, naturally draped horizontal ribbon swags, physically accurate fabric folds, elegant curved ribbon edges, detailed evergreen needles, believable branch attachment, realistic glass ornament reflections, natural shadows, physically accurate lighting, refined editorial colour grading, crisp fine details, premium Pinterest Christmas decorating photography, vertical 2:3 portrait aspect ratio, photorealistic, ultra-realistic, high-resolution 4K visual quality. No people, no human figures, no text overlays, no typography, no logos, no watermarks, no borders, no cartoon styling, no illustration, no CGI appearance, no plastic-looking fabric, no vertical ribbon streamers, no oversized bows, no tangled ribbon, no straight horizontal ribbon lines, no floating fabric, no uneven swag spacing, no excessively deep curves, no duplicated ornaments, no distorted branches, no overcrowded decorations, no motion blur, no bokeh, no artificial depth-of-field blur, no excessive glow, no overexposed fairy lights. Keep the entire Christmas tree, every horizontal ribbon swag, fabric texture and visible interior detail naturally sharp, clear and realistically detailed.
  • Save

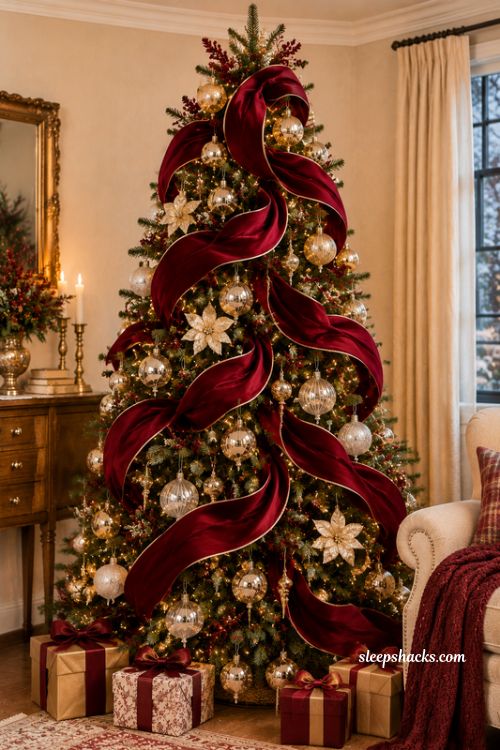
Wide ribbon, three inches or more, makes a bold statement. Tuck one end at the top of the tree, then let the ribbon fall in a long, wavy cascade over the branches, tucking it behind a branch every foot or so to hold the waves. It looks like a flowing river of fabric.

Wide ribbon costs more per yard, so choose a wired edge and measure the tree before you cut. It suits tall, full trees, where the width won’t swamp the branches. On a small tabletop tree, wide ribbon overpowers everything else, so go narrower there. Add lights first so the ribbon doesn’t hide them.

7. Horizontal Ribbon Swags Around the Tree
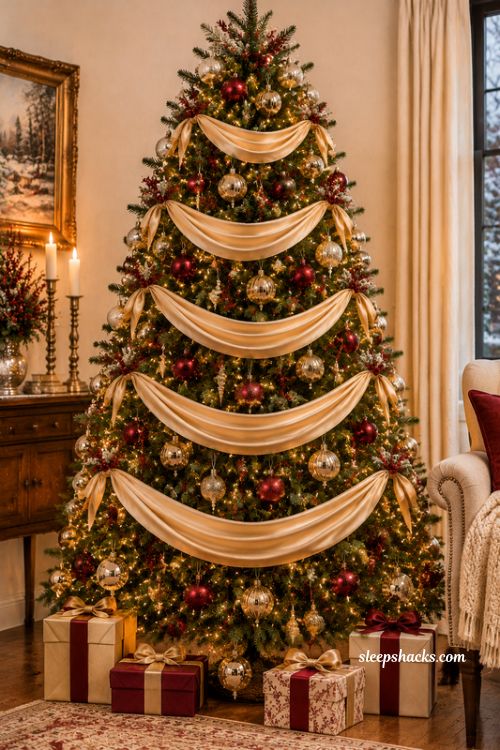
How to decorate a Christmas tree with elegant horizontal satin ribbon swags
  • Save

Instead of up-and-down streamers, run ribbon in soft horizontal swags, looping from branch to branch around the whole tree. Each swag sags in a gentle curve four to six inches deep, like bunting at a party. Anchor each end with a short piece of wire and let the middle drop.

Swags give a classic, polished look, a bit like a department store window. They work best with ribbon that drapes well, such as satin or velvet. Work from the top down so each row sits neatly on the one above. It takes patience, about forty minutes, and it suits anyone who likes a tidy, formal tree.

8. Spiral Ribbon Wrap From Top to Bottom


Start at the top and wind the ribbon around the tree in a slow downward spiral, tucking it behind branches every few inches so it follows the shape. The ribbon appears and disappears as it winds, like a path through a forest. Keep a consistent gap of about a hand’s width between turns.

This is the quickest way to cover a whole tree, and it looks good at any size. A helper can pass the spool around while you hold the end. Choose ribbon with some body so it doesn’t flop between branches. Hang the lights first, because ribbon laid over them can hide the glow.

9. Ribbon Bow Tree Topper
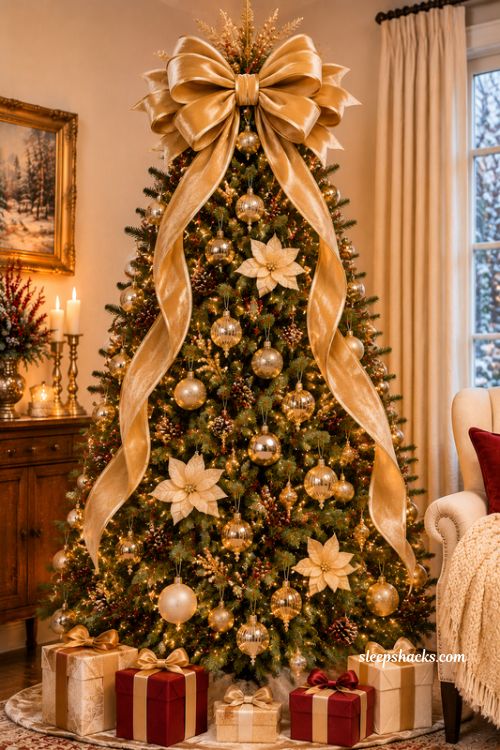
Ribbon bow Christmas tree topper with elegant oversized velvet bow and flowing tails
  • Save

Make a large bow with loops about eight inches across and long tails, then wire it to the top branch so the tails stream down each side. A wired bow keeps its perky shape. Add a few small ribbon loops behind it to make a fuller starburst.

A bow topper often costs less than a star or angel, and it has a warm, homemade look. Match its color to the other ribbon on your tree so the whole thing feels planned. If the top branch is thin or bendy, tape a bamboo skewer along it for support. Keep the tails clear of hot bulbs.

10. Choosing Ribbon Width, Color, and Texture
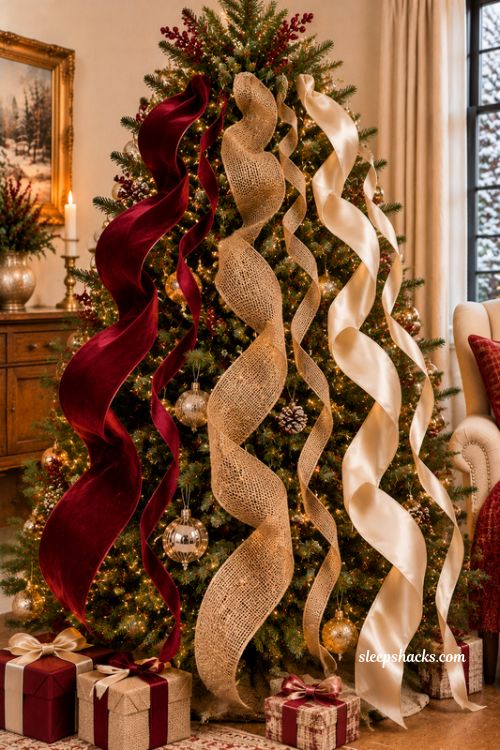
Easy ways to choose Christmas tree ribbon width color and texture for a beautiful holiday look
  • Save

Hold a few ribbons against your tree before you cut anything. Narrow ribbon, about an inch wide, gets lost on a big tree, while ribbon around three inches can overwhelm a small one. Velvet looks rich, burlap looks rustic, and satin gives shine. Lay each swatch over a branch and step back to see it from across the room.

As a rule, use two ribbon types at most so the tree stays cohesive. Buy a little more than you think you need, since a mismatch is harder to fix than a leftover roll. This ten-minute test also saves money, because it stops you buying rolls you will never use.

11. Securing Ribbon With Floral Wire and Pipe Cleaners
A medium-wide, eye-level professional interior photograph captured with a full-frame camera and 35mm lens, featuring a beautiful evergreen Christmas tree decorated with long, luxurious ribbon streamers cascading vertically from an elegant oversized tree topper. Three or four generous ribbon tails flow gracefully down the front of the tree in waterfall-like curves, each hanging at a slightly different length to create movement, height and visual drama. Use two or three coordinating ribbon shades, such as champagne gold, soft ivory and deep burgundy. Choose wide wired-edge velvet and satin ribbons with realistic fabric folds and naturally curved edges, allowing each streamer to remain visible against the evergreen branches. Secure the ribbons discreetly with concealed floral wire at regular intervals, approximately every foot, so they follow the natural shape of the tree without sagging or disappearing into the foliage. The setting is an elegant European cottage-style living room with warm ivory walls, natural wooden furniture, delicate glass ornaments and beautifully wrapped Christmas presents. Keep additional decorations understated so the flowing ribbon remains the main attraction. Warm golden Christmas fairy lights illuminate the ribbon textures and evergreen needles, creating realistic highlights, soft shadows and delicate reflections. The atmosphere feels luxurious, nostalgic, cozy and festive. Show the entire Christmas tree from its topper to its base in a vertical 2:3 composition. Clearly display all three or four flowing ribbon tails, their different lengths and their elegant waterfall arrangement. Professional luxury home decor magazine photography, authentic interior styling, realistic velvet and satin textures, natural fabric folds, accurate proportions, balanced lighting, crisp details, refined editorial colour grading, photorealistic, ultra-realistic, high-resolution 4K quality. No people, no text, no logos, no watermarks, no CGI, no cartoon styling, no floating ribbon, no tangled fabric, no distorted bows, no hidden ribbon tails, no motion blur, no bokeh, no artificial depth-of-field blur. Keep the entire scene naturally sharp and clearly visible.
  • Save

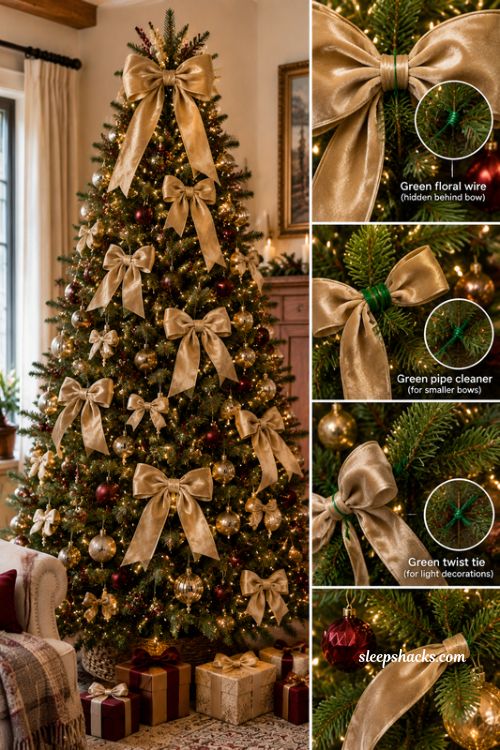
Floral wire, green pipe cleaners, and twist ties blend into the branches and hold ribbon firmly. Wrap the wire around the middle of a bow or loop, twist it around a branch two or three times, and trim the extra. Green wire practically vanishes against artificial pine needles.

This stops ribbon from slipping down when someone brushes past the tree. A small spool of floral wire costs little and lasts through many seasons. It is especially useful on heavily decorated trees and in homes with curious pets. Always trim the wire ends short so they don’t poke, which matters if children will be close.

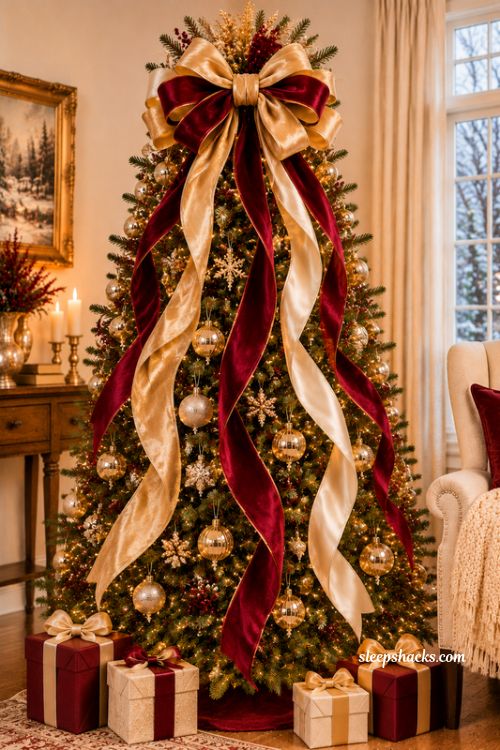
12. Ribbon Streamers Cascading From the Topper
A medium-wide, eye-level professional Christmas interior photograph captured with a full-frame camera and 35mm lens, featuring a beautiful evergreen Christmas tree decorated with luxurious layered ribbon as the main focal point. Wide plaid ribbon is combined with narrower satin ribbon placed directly on top, creating elegant double-layered bows and flowing swags. The narrow ribbon forms a contrasting decorative border along the wider ribbon, adding depth, texture and a sophisticated designer appearance. Use a coordinated palette of warm ivory, champagne gold and subtle forest green. Combine wide cream-and-gold plaid ribbon with delicate narrow champagne-gold satin ribbon. Show several beautifully layered bows and ribbon cascades distributed naturally throughout the branches, with realistic fabric folds, visible woven patterns and elegant wired edges. The setting is a warm European cottage-style living room with ivory walls, natural oak furniture, delicate glass ornaments and beautifully wrapped Christmas presents. Understated decorations complement the layered ribbons without overcrowding the tree. Warm golden fairy lights illuminate the different ribbon textures, creating natural highlights and soft shadows. The atmosphere feels elegant, cozy, nostalgic and festive, like a professionally decorated Christmas home. Show the entire Christmas tree in a vertical 2:3 composition, making the contrasting ribbon layers clearly visible. Include a few closer decorative details while keeping the overall tree recognizable. Professional luxury home decor magazine photography, authentic textile textures, realistic satin and plaid materials, natural folds, accurate proportions, balanced lighting, crisp details, refined editorial colour grading, photorealistic, ultra-realistic, high-resolution 4K quality. No people, no text, no logos, no watermarks, no CGI, no cartoon styling, no tangled ribbons, no mismatched colours, no distorted bows, no duplicated ornaments, no motion blur, no bokeh, no artificial depth-of-field blur. Keep the entire scene naturally sharp and clearly visible.
  • Save

Attach three or four long ribbon tails under the topper and let them hang down the front of the tree, pinned with wire every foot or so. They flow like waterfalls in slightly different lengths, which draws the eye upward. Use two or three coordinating shades for more depth.

This works well when you want height and drama without adding more ornaments. Each tail needs roughly two yards on a six-foot tree, but measure with a piece of string first. Streamers look especially pretty on narrow trees. On very full ones they can disappear, so choose ribbon with a wired edge to keep them visible.

13. Layering Two Ribbons Together for Depth

A medium-wide, eye-level professional Christmas interior photograph captured with a full-frame camera and 35mm lens, featuring a beautiful evergreen Christmas tree decorated with luxurious layered ribbon as the main focal point. Wide plaid ribbon is combined with narrower satin ribbon placed directly on top, creating elegant double-layered bows and flowing swags. The narrow ribbon forms a contrasting decorative border along the wider ribbon, adding depth, texture and a sophisticated designer appearance. Use a coordinated palette of warm ivory, champagne gold and subtle forest green. Combine wide cream-and-gold plaid ribbon with delicate narrow champagne-gold satin ribbon. Show several beautifully layered bows and ribbon cascades distributed naturally throughout the branches, with realistic fabric folds, visible woven patterns and elegant wired edges. The setting is a warm European cottage-style living room with ivory walls, natural oak furniture, delicate glass ornaments and beautifully wrapped Christmas presents. Understated decorations complement the layered ribbons without overcrowding the tree. Warm golden fairy lights illuminate the different ribbon textures, creating natural highlights and soft shadows. The atmosphere feels elegant, cozy, nostalgic and festive, like a professionally decorated Christmas home. Show the entire Christmas tree in a vertical 2:3 composition, making the contrasting ribbon layers clearly visible. Include a few closer decorative details while keeping the overall tree recognizable. Professional luxury home decor magazine photography, authentic textile textures, realistic satin and plaid materials, natural folds, accurate proportions, balanced lighting, crisp details, refined editorial colour grading, photorealistic, ultra-realistic, high-resolution 4K quality. No people, no text, no logos, no watermarks, no CGI, no cartoon styling, no tangled ribbons, no mismatched colours, no distorted bows, no duplicated ornaments, no motion blur, no bokeh, no artificial depth-of-field blur. Keep the entire scene naturally sharp and clearly visible.
  • Save

Lay a narrow ribbon on top of a wider one in a contrasting texture, such as thin gold satin over wide plaid, and treat the pair as one when you bend or tie. The stack gives richness in a single bow or swag, and the wider ribbon frames the narrow one like a border.

Layering costs a little more, but it makes basic ribbon look designer. Choose colors that share one tone, like cream and gold, so they don’t clash. It suits trees that need a finishing touch. Test a scrap pairing first, since some combinations look heavy once they are tied.

Final Thoughts

Think of ribbon as the last stitch in a tree you have already put your heart into. It doesn’t need to be perfect, and it won’t be, because branches are never perfectly even. That unevenness is part of what makes a tree look lived in and loved.

So put on some music, grab a pair of scissors, and start with whichever method felt easiest. By the time the last bow is tucked in, you will probably be standing back with a cup of something warm, smiling at your own handiwork.

Frequently Asked Questions

Q: How much ribbon do I need for a Christmas tree?
It depends on the tree and the method, so wrap a piece of string around the tree the way you plan to place the ribbon, then measure that string and buy a little extra.

Q: Should I add ribbon before or after the ornaments?
Add it after the lights and before the ornaments for the neatest look, though tucked or draped ribbon also works well once the ornaments are up.

Q: What kind of ribbon is best for a Christmas tree?
Wired ribbon holds its shape best, and velvet, satin, and grosgrain all look good, so pick one that suits the width and style of your tree.

By elif

Leave a Reply

Your email address will not be published. Required fields are marked *